
Traditional Black Forest Cake (Schwarzwälder Kirschtorte)
By Zeina Haddad
Published:

Hi there 👋 I’m Zeina Haddad. I believe that food doesn't need to "look perfect", but to "taste more than perfect"! As author of “My Mama Knows Best!”, I share authentic Lebanese and global recipes. My Promise to You: 100% AI-Free recipes. Every dish is written by me, tested by me, and tasted by my family. Join me in celebrating the joy of slow, intentional cooking.
Description
This is the ultimate guide to making a traditional Black Forest Cake (Schwarzwälder Kirschtorte) at home. Forget dry sponges and runny filling—our recipe uses a feather-light chocolate Génoise soaked in a boozy Kirsch syrup, layered with tart cherries and a special stabilized whipped cream that holds its shape for days.
Our step-by-step tutorial makes the recipe easy to follow and guarantees a show-stopping German dessert even for a baking novice.
This beautiful and delicious cake is perfect as a birthday cake or for holiday gatherings.
Pro-Tips
💡
Why use a Springform Pan for Black Forest Cake? We choose a springform pan for two reasons. First, this sponge rises much higher than a standard cake tin can handle, so the tall sides are essential. Second, Génoise is delicate; the removable ring allows you to unmold the cake without flipping or banging the pan, which could deflate or break your beautiful sponge.
Why use Gelatin in the whipped cream? Standard whipped cream will weep and collapse under the weight of the cake layers. Adding gelatin "stabilizes" it, ensuring your Black Forest Cake slices cleanly and holds its shape for days.
What is the "Finger Test" for heating eggs? When heating your eggs and sugar over the bain-marie, rub a drop between your fingers. If you feel any sugar granules, keep whisking. If it’s smooth and warm, it’s ready to whip.
How much syrup should I use on the sponge? Don't Fear the Syrup! Génoise is a dry sponge by nature—it is designed to drink up liquid. Do not be shy with the cherry syrup. If you think you've added enough, add a little more! This is the secret to a moist cake.
What is a good substitute for Cake Flour? If you do not have cake flour on hand, you can make your own substitute: use 120 g all-purpose flour and 40 g cornstarch to replace the 160g of cake flour.
How do I make chocolate shavings? You can make Chocolate shavings by scraping a chocolate bar with a potato peeler or a sharp knife. Tip: Refrigerate the shavings immediately after making them so they don't melt in your hand while decorating.
Notes
📌
Storage Instructions: Because of the fresh cream, this Black Forest Cake must be kept refrigerated. It is best enjoyed within 3 days. Use a cake dome or airtight container to prevent the cream from absorbing fridge odors.
Can I freeze it? Yes! Because we stabilized the cream, this cake freezes well. Place the cake (or slices) in the freezer for 1 hour to harden the cream, then wrap tightly in plastic wrap. Thaw in the fridge overnight before serving.
What can I make-ahead?
The Sponge: Can be baked 2 days ahead. Wrap the cooled layers in plastic wrap and keep at room temperature (or freeze for up to a month).
The Syrup: Can be made 1 week ahead and stored in a jar in the fridge.
The Whipped Cream: Must be made fresh on the day of assembly. Even with gelatin, it sets quickly and is difficult to spread if made the day before.
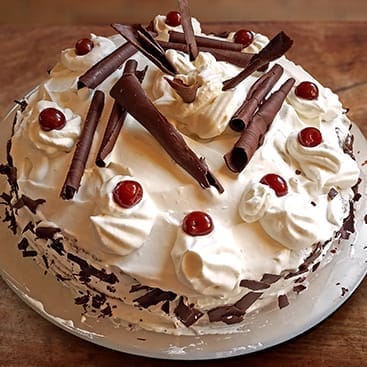
Traditional Black Forest Cake
(Schwarzwälder Kirschtorte)
🍴 Dessert
🌍 German
Yields:
12 servings
A classic German Schwarzwälder Kirschtorte featuring a light chocolate Génoise sponge, tart cherry filling spiked with Kirsch, and stabilized whipped cream. The ultimate celebration cake.
Ingredients
Chocolate Génoise
The Cherry Filling & Syrup
Note: If using Griottes au Kirsch (cherries already soaked in brandy), you may skip adding extra alcohol.
Stabilized Whipped Cream
Decoration
Instructions
Phase 1: The Chocolate Génoise
1.
Prep: Preheat your oven to 175°C (350°F). Grease the bottom of a 23 cm (9-inch) springform pan and line it with parchment paper.
📌Do not grease the sides (this helps the sponge climb up the walls).
2.
Sift Dry Ingredients: In a medium bowl, sift together the flour, cocoa powder, baking powder, and salt. Sift twice to ensure it is perfectly aerated.
3.
Warm the Eggs: Place eggs and sugar in the bowl of your stand mixer. Place the bowl over a saucepan of simmering water (bain-marie). Whisk constantly by hand until the sugar dissolves and the mixture is warm to the touch (approx 40°C/105°F).
📌Do not overheat or you get a dry génoise.
4.
The Ribbon Stage: Transfer the bowl to the stand-mixer fitted with the whisk attachment. Beat on high speed for 5–7 minutes. The mixture should cool, triple in volume, turn pale, and reach the "ribbon stage" (when you lift the whisk, the batter falls back in a thick ribbon that sits on the surface for a few seconds before sinking). Beat in the vanilla and rum.
📌Do not bang the whisk against the side of the bowl when you're done or you will deflate the batter.
5.
The Fold (Crucial Step): Sift the dry ingredients over the egg mixture in 3 additions. Use a spatula to fold gently in a "J" motion (cut down the middle, scoop up the bottom, and fold over).
📌Do not overmix, or the cake will be tough.
6.
Temper the Butter: Add one big scoop of the cake batter into the lukewarm melted butter and mix vigorously until combined. (This lightens the butter so it doesn't sink).
7.
Final Combine: Pour the butter mixture back into the main batter. Fold gently just until combined.
8.
Bake: Pour the batter into the prepared pan. Bake for 25–30 minutes or until a toothpick inserted into its center comes out clean.
9.
Remove from pan while hot: run a knife around the edge of the pan to losen the cake then invert onto a wire rack and release the cake. Let it sit for 10–15 mins, then turn it so its top faces up and let it cool completely.
Phase 2: The Syrup & Filling
1.
Drain: Drain the cherries over a bowl to catch all the juice. Set cherries aside.
2.
The Syrup: Pour the cherry juice into a small saucepan (add the 2 tbsp sugar if the juice is very sour). Simmer for 3–4 minutes to reduce slightly. Remove from heat. Once cooled, stir in the Kirsch.
Phase 3: Stabilized Whipped Cream
1.
Chill ingredients and equipments: In your mixing bowl, place the heavy cream, icing sugar, and vanilla extract and stir to combine. Cover and chill the bowl and wire whisk in the refrigerator for about 1 hour.
2.
Bloom Gelatin: Sprinkle the gelatin powder over the cold water in a small bowl. Let it sit for 5 minutes (it will look like rubber). Microwave for 10–15 seconds until liquid. Let it cool slightly (it must be liquid but not hot).
3.
Whip: Whip the cold heavy cream, icing sugar, and vanilla until you reach soft peaks.
4.
Combine: While the mixer is running on low speed, pour the liquid gelatin in a slow, steady stream into the cream. Increase speed and whip until stiff peaks form. (📌Do not over-whip or it will turn to butter). Refrigerate.
Phase 4: Assembly
1.
Slice: Using a serrated knife, cut the cooled cake horizontally into 3 even layers. (If your cake is shorter, 2 layers is acceptable).
📌Cut your sponge only near the time of assembly.
2.
Layer 1: Turn the top sponge layer over (top of cake becomes bottom) and place on your serving platter. Generously brush with 1/3 of the cherry syrup. Spread a layer of whipped cream. Press half of the cherries into the cream.
3.
Layer 2: Top with the second sponge layer. Brush generously with syrup. Spread whipped cream and the remaining cherries.
4.
Layer 3: Top with the final sponge layer. Brush with the remaining syrup.
5.
Frost: Cover the top and sides of the cake with the remaining whipped cream.
6.
Decorate: Press chocolate shavings onto the sides of the cake with your hand. Pipe rosettes of cream on top and garnish with whole cherries and chocolate curls.
7.
Rest: Refrigerate for at least 4 hours (or overnight) before slicing. This allows the syrup to soak through and the structure to firm up.
Nutrition
per serving (slice):
Calories: 550 Kcal | Fat: 38 g | Carbs: 52 g | Sugar: 40 g | Protein: 8 g
Nutritional information is based on third-party calculations and should be considered an estimate only. Actual nutritional content will vary based upon brands used, measuring methods, cooking method, portion sizes, and more.
Leave a Review
Your email address will not be published. Required fields are marked *
Select a rating *

DISCLOSURE: As an Amazon Associate, I earn from qualifying purchases. My posts may contain affiliate links, which means I may receive a small commission, at no cost to you, if you make a purchase through a link. This helps support the blog and allows me to continue creating free recipes and content for you.
I only recommend products, tools, and ingredients that I personally use, or reviewed and trust. My opinions are always my own.

All rights reserved
©2025 – 2026 Parsley Me This! by Zeina Haddad
Recent Reviews: